Sync-Client as Windows Service
If Seafile is to start automatically in the background on a server to synchronize data, it is necessary to set up Seafile as a service. This ensures that Seafile will start without user login and synchronize data if/when the server is restarted.
To run Seafile as a service, an additional tool is needed, which allows to run any program under Windows as a service.
This is needed
- Internet access
- luckycloud account with luckycloud Home, Team, luckycloud pro Business or Enterprise (recommendation: additional user which is only used for Seafile as a service)
- Administrator rights on the server
- Seafile Sync Client
Download from NSSM
- first download the NSSM (Non-Sucking Service Manager) tool. http://nssm.cc/download
- unpack the archive and rename the contained folder. e.g.
nssm-2.24tonssm. - then copy the folder
nssme.g. toC:\. After that the pathC:\nssm\win64should exist.
Prepare Seafile
- Install the Seafile Sync Client as usual
- It is recommended to set up an additional "service user" for "Seafile as a service" to avoid any interference with password changes.
- log in to Seafile client and syncronize the desired libraries with local folders.
- open Seafile options and disable automatic start of Seafile ((right click icon in taskbar and select "Settings", then disable "Automatically start Seafile after login", confirm with "OK"). Exit Seafile completely (right click icon in the taskbar and select "Exit").
Set up Seafile service
- open the command prompt or Powershell with administrator rights (right click on START and then select the appropriate option).
- open the nssm GUI.
C:\nssm\win64\nssm.exe install seafileservice. - now a GUI of the NSSM appears, with which Seafile is set up as a service. Paths may need to be adjusted if you have not installed Seafile in the default directories.
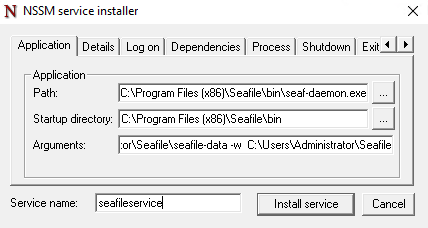
Tab Application
| Option | Value | Notes |
|---|---|---|
| Path | C:\Program Files (x86)\Seafile\bin\seaf-daemon.exe |
Path may need to be adjusted if you have not installed Seafile in the default directories. |
Startup directory C:\Program Files (x86)\Seafile\bin |
Path may need to be modified if you have not installed Seafile in the default directories. | |
Arguments -c C:\Users\Administrator\ccnet -d C:\Users\Administrator\Seafile\seafile-data -w C:\Users\Administrator\Seafile |
"Administrator" is the username of the active user. The paths may have to be adapted to your environment. |
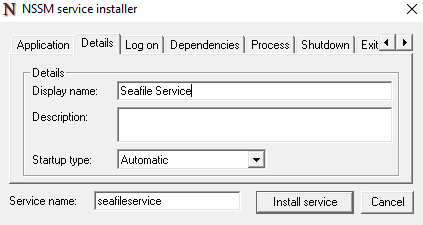
Tab Details
| option | value | annotations |
|---|---|---|
| Display name | Seafile Service |
- |
| Description | - |
Optional |
| Startup type | Automatic |
- |
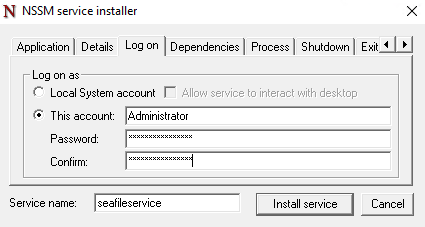
Tab Log on
| option | value | annotations |
|---|---|---|
| This account | Administrator |
Username of the active user |
| Password | <Password> |
Password of the active user |
| Confirm | <Password> |
Password of the active user |
- Then press "Install service".
- The installation of the service will be confirmed via the NSSM GUI, you can accept this by pressing "OK".
Start/stop Seafile service
You can now start the Seafile service for the first time. To do this, enter the following command in the admin prompt/powershell console:
net start seafileservice
- to stop the seafile service, type the following command in the admin prompt/powershell console:
net stop seafileservice
Seafile will now run as a service in the background and synchronize your data.
Making changes with the Seafile client
If you want to make changes to the Seafile client, it is important that the Seafile service has been stopped before. Otherwise the parallel operation of the service plus GUI client can lead to database conflicts.
- stop the Seafile service (see ## Start/Stop Seafile Service)
- start the Seafile client manually
- make the changes
- stop the Seafile client
- restart the Seafile service (see ## Start/Stop Seafile Service)